Connector容器主要负责解析socket请求,在tomcat中的源码位于org.apache.catalina.connector和org.apache.coyote包路径下;通过上两节的分析,我们知道了Connector是Service的子容器,而Service又是Server的子容器。在server.xml文件中配置,然后在Catalina类中通过Digester完成实例化。在server.xml中默认配置了两种Connector的实现,分别用来处理Http请求和AJP请求。
Connector的实现一共有以下三种:1、Http Connector:解析HTTP请求,又分为BIO Http Connector和NIO Http Connector,即阻塞IO Connector和非阻塞IO Connector。本文主要分析NIO Http Connector的实现过程。
2、AJP:基于AJP协议,用于Tomcat与HTTP服务器通信定制的协议,能提供较高的通信速度和效率。如与Apache服务器集成时,采用这个协议。
3、APR HTTP Connector:用C实现,通过JNI调用的。主要提升对静态资源(如HTML、图片、CSS、JS等)的访问性能。
具体要使用哪种Connector可以在server.xml文件中通过protocol属性配置如下:
然后看一下Connector的构造器:
public Connector(String protocol) { setProtocol(protocol); // Instantiate protocol handler ProtocolHandler p = null; try { Class clazz = Class.forName(protocolHandlerClassName); p = (ProtocolHandler) clazz.getConstructor().newInstance(); } catch (Exception e) { log.error(sm.getString( "coyoteConnector.protocolHandlerInstantiationFailed"), e); } finally { this.protocolHandler = p; } if (Globals.STRICT_SERVLET_COMPLIANCE) { uriCharset = StandardCharsets.ISO_8859_1; } else { uriCharset = StandardCharsets.UTF_8; }}public void setProtocol(String protocol) { boolean aprConnector = AprLifecycleListener.isAprAvailable() && AprLifecycleListener.getUseAprConnector(); if ("HTTP/1.1".equals(protocol) || protocol == null) { if (aprConnector) { setProtocolHandlerClassName("org.apache.coyote.http11.Http11AprProtocol"); } else { setProtocolHandlerClassName("org.apache.coyote.http11.Http11NioProtocol"); } } else if ("AJP/1.3".equals(protocol)) { if (aprConnector) { setProtocolHandlerClassName("org.apache.coyote.ajp.AjpAprProtocol"); } else { setProtocolHandlerClassName("org.apache.coyote.ajp.AjpNioProtocol"); } } else { setProtocolHandlerClassName(protocol); }} 通过分析Connector构造器的源码可以知道,每一个Connector对应了一个protocolHandler,一个protocolHandler被设计用来监听服务器某个端口的网络请求,但并不负责处理请求(处理请求由Container组件完成)。下面就以Http11NioProtocol为例分析Http请求的解析过程。
在Connector的startInterval方法中启动了protocolHandler,代码如下:protected void startInternal() throws LifecycleException { // Validate settings before starting if (getPort() < 0) { throw new LifecycleException(sm.getString( "coyoteConnector.invalidPort", Integer.valueOf(getPort()))); } setState(LifecycleState.STARTING); try { protocolHandler.start(); } catch (Exception e) { throw new LifecycleException( sm.getString("coyoteConnector.protocolHandlerStartFailed"), e); }} Http11NioProtocol创建一个org.apache.tomcat.util.net.NioEndpoint实例,然后将监听端口并解析请求的工作全被委托给NioEndpoint实现。tomcat在使用Http11NioProtocol解析HTTP请求时一共设计了三种线程,分别为Acceptor,Poller和Worker。
1、Acceptor线程
Acceptor实现了Runnable接口,根据其命名就知道它是一个接收器,负责接收socket,其接收方法是serverSocket.accept()方式,获得SocketChannel对象,然后封装成tomcat自定义的org.apache.tomcat.util.net.NioChannel。虽然是Nio,但在接收socket时仍然使用传统的方法,使用阻塞方式实现。Acceptor以线程池的方式被创建和管理,在NioEndpoint的startInternal()方法中完成Acceptor的启动,源码如下:
public void startInternal() throws Exception { if (!running) { running = true; paused = false; processorCache = new SynchronizedStack<>(SynchronizedStack.DEFAULT_SIZE, socketProperties.getProcessorCache()); eventCache = new SynchronizedStack<>(SynchronizedStack.DEFAULT_SIZE, socketProperties.getEventCache()); nioChannels = new SynchronizedStack<>(SynchronizedStack.DEFAULT_SIZE, socketProperties.getBufferPool()); // Create worker collection if ( getExecutor() == null ) { createExecutor(); } //设置最大连接数,默认值为maxConnections = 10000,通过同步器AQS实现。 initializeConnectionLatch(); //默认是2个,Math.min(2,Runtime.getRuntime().availableProcessors());和虚拟机处理器个数比较 // Start poller threads pollers = new Poller[getPollerThreadCount()]; for (int i=0; i 继续追踪startAcceptorThreads的源码
protected final void startAcceptorThreads() { //启动Acceptor线程,默认是1个 int count = getAcceptorThreadCount(); acceptors = new Acceptor[count]; for (int i = 0; i < count; i++) { acceptors[i] = createAcceptor(); String threadName = getName() + "-Acceptor-" + i; acceptors[i].setThreadName(threadName); Thread t = new Thread(acceptors[i], threadName); t.setPriority(getAcceptorThreadPriority()); t.setDaemon(getDaemon()); t.start(); }} Acceptor线程的核心代码在它的run方法中:
protected class Acceptor extends AbstractEndpoint.Acceptor { @Override public void run() { int errorDelay = 0; // Loop until we receive a shutdown command while (running) { // Loop if endpoint is paused while (paused && running) { state = AcceptorState.PAUSED; try { Thread.sleep(50); } catch (InterruptedException e) { // Ignore } } if (!running) { break; } state = AcceptorState.RUNNING; try { //if we have reached max connections, wait countUpOrAwaitConnection(); SocketChannel socket = null; try { // Accept the next incoming connection from the server // socket //接收socket请求 socket = serverSock.accept(); } catch (IOException ioe) { // We didn't get a socket countDownConnection(); if (running) { // Introduce delay if necessary errorDelay = handleExceptionWithDelay(errorDelay); // re-throw throw ioe; } else { break; } } // Successful accept, reset the error delay errorDelay = 0; // Configure the socket if (running && !paused) { // setSocketOptions() will hand the socket off to // an appropriate processor if successful if (!setSocketOptions(socket)) { closeSocket(socket); } } else { closeSocket(socket); } } catch (Throwable t) { ExceptionUtils.handleThrowable(t); log.error(sm.getString("endpoint.accept.fail"), t); } } state = AcceptorState.ENDED; } private void closeSocket(SocketChannel socket) { countDownConnection(); try { socket.socket().close(); } catch (IOException ioe) { if (log.isDebugEnabled()) { log.debug(sm.getString("endpoint.err.close"), ioe); } } try { socket.close(); } catch (IOException ioe) { if (log.isDebugEnabled()) { log.debug(sm.getString("endpoint.err.close"), ioe); } } }} Acceptor完成了socket请求的接收,然后交给NioEndpoint 进行配置,继续追踪Endpoint的setSocketOptions方法。
protected boolean setSocketOptions(SocketChannel socket) { // Process the connection try { //disable blocking, APR style, we are gonna be polling it //设置为非阻塞 socket.configureBlocking(false); Socket sock = socket.socket(); socketProperties.setProperties(sock); NioChannel channel = nioChannels.pop(); if (channel == null) { SocketBufferHandler bufhandler = new SocketBufferHandler( socketProperties.getAppReadBufSize(), socketProperties.getAppWriteBufSize(), socketProperties.getDirectBuffer()); if (isSSLEnabled()) { channel = new SecureNioChannel(socket, bufhandler, selectorPool, this); } else { channel = new NioChannel(socket, bufhandler); } } else { channel.setIOChannel(socket); channel.reset(); } //轮训pollers数组元素,调用Poller的register方法,完成channel的注册。 getPoller0().register(channel); } catch (Throwable t) { ExceptionUtils.handleThrowable(t); try { log.error("",t); } catch (Throwable tt) { ExceptionUtils.handleThrowable(tt); } // Tell to close the socket return false; } return true;} 分析setSocketOptions的源码可以知道,该方法的主要功能是利用传入的SocketChannel参数生成SecureNioChannel或者NioChannel,然后注册到Poller线程的selector中,可以进一步了解Java nio的相关知识,对这一块内容有更深的理解。
2、Poller线程
Poller同样实现了Runnable接口,是NioEndpoint类的内部类。在Endpoint的startInterval方法中创建、配置并启动了Poller线程,见代码清单4。Poller主要职责是不断轮询其selector,检查准备就绪的socket(有数据可读或可写),实现io的多路复用。其构造其中初始化了selector。
public Poller() throws IOException { this.selector = Selector.open();} 在分析Acceptor的时候,提到了Acceptor接受到一个socket请求后,调用NioEndpoint的setSocketOptions方法(代码清单6),该方法生成了NioChannel后调用Poller的register方法生成PoolorEvent后加入到Eventqueue,register方法的源码如下:
public void register(final NioChannel socket) { socket.setPoller(this); NioSocketWrapper ka = new NioSocketWrapper(socket, NioEndpoint.this); socket.setSocketWrapper(ka); ka.setPoller(this); ka.setReadTimeout(getSocketProperties().getSoTimeout()); ka.setWriteTimeout(getSocketProperties().getSoTimeout()); ka.setKeepAliveLeft(NioEndpoint.this.getMaxKeepAliveRequests()); ka.setSecure(isSSLEnabled()); ka.setReadTimeout(getConnectionTimeout()); ka.setWriteTimeout(getConnectionTimeout()); PollerEvent r = eventCache.pop(); ka.interestOps(SelectionKey.OP_READ);//this is what OP_REGISTER turns into. //生成PoolorEvent并加入到Eventqueue if ( r==null) r = new PollerEvent(socket,ka,OP_REGISTER); else r.reset(socket,ka,OP_REGISTER); addEvent(r);} Poller的核心代码也在其run方法中:
public void run() { // Loop until destroy() is called // 调用了destroy()方法后终止此循环 while (true) { boolean hasEvents = false; try { if (!close) { hasEvents = events(); if (wakeupCounter.getAndSet(-1) > 0) { //if we are here, means we have other stuff to do //do a non blocking select //非阻塞的 select keyCount = selector.selectNow(); } else { //阻塞selector,直到有准备就绪的socket keyCount = selector.select(selectorTimeout); } wakeupCounter.set(0); } if (close) { //该方法遍历了eventqueue中的所有PollerEvent,然后依次调用PollerEvent的run,将socket注册到selector中。 events(); timeout(0, false); try { selector.close(); } catch (IOException ioe) { log.error(sm.getString("endpoint.nio.selectorCloseFail"), ioe); } break; } } catch (Throwable x) { ExceptionUtils.handleThrowable(x); log.error("",x); continue; } //either we timed out or we woke up, process events first if ( keyCount == 0 ) hasEvents = (hasEvents | events()); Iterator iterator = keyCount > 0 ? selector.selectedKeys().iterator() : null; // Walk through the collection of ready keys and dispatch // any active event. //遍历就绪的socket事件 while (iterator != null && iterator.hasNext()) { SelectionKey sk = iterator.next(); NioSocketWrapper attachment = (NioSocketWrapper)sk.attachment(); // Attachment may be null if another thread has called // cancelledKey() if (attachment == null) { iterator.remove(); } else { iterator.remove(); //调用processKey方法对有数据读写的socket进行处理,在分析Worker线程时会分析该方法 processKey(sk, attachment); } }//while //process timeouts timeout(keyCount,hasEvents); }//while getStopLatch().countDown();} run方法中调用了events方法:
public boolean events() { boolean result = false; PollerEvent pe = null; for (int i = 0, size = events.size(); i < size && (pe = events.poll()) != null; i++ ) { result = true; try { //将pollerEvent中的每个socketChannel注册到selector中 pe.run(); pe.reset(); if (running && !paused) { //将注册了的pollerEvent加到endPoint.eventCache eventCache.push(pe); } } catch ( Throwable x ) { log.error("",x); } } return result;} 继续跟进PollerEvent的run方法:
public void run() { if (interestOps == OP_REGISTER) { try { //将SocketChannel注册到selector中,注册时间为SelectionKey.OP_READ读事件 socket.getIOChannel().register( socket.getPoller().getSelector(), SelectionKey.OP_READ, socketWrapper); } catch (Exception x) { log.error(sm.getString("endpoint.nio.registerFail"), x); } } else { final SelectionKey key = socket.getIOChannel().keyFor(socket.getPoller().getSelector()); try { if (key == null) { // The key was cancelled (e.g. due to socket closure) // and removed from the selector while it was being // processed. Count down the connections at this point // since it won't have been counted down when the socket // closed. socket.socketWrapper.getEndpoint().countDownConnection(); ((NioSocketWrapper) socket.socketWrapper).closed = true; } else { final NioSocketWrapper socketWrapper = (NioSocketWrapper) key.attachment(); if (socketWrapper != null) { //we are registering the key to start with, reset the fairness counter. int ops = key.interestOps() | interestOps; socketWrapper.interestOps(ops); key.interestOps(ops); } else { socket.getPoller().cancelledKey(key); } } } catch (CancelledKeyException ckx) { try { socket.getPoller().cancelledKey(key); } catch (Exception ignore) {} } }} 3、Worker线程
Worker线程即SocketProcessor是用来处理Socket请求的。SocketProcessor也同样是Endpoint的内部类。在Poller的run方法中(代码清单8)监听到准备就绪的socket时会调用processKey方法进行处理:
protected void processKey(SelectionKey sk, NioSocketWrapper attachment) { try { if ( close ) { cancelledKey(sk); } else if ( sk.isValid() && attachment != null ) { //有读写事件就绪时 if (sk.isReadable() || sk.isWritable() ) { if ( attachment.getSendfileData() != null ) { processSendfile(sk,attachment, false); } else { unreg(sk, attachment, sk.readyOps()); boolean closeSocket = false; // Read goes before write // socket可读时,先处理读事件 if (sk.isReadable()) { //调用processSocket方法进一步处理 if (!processSocket(attachment, SocketEvent.OPEN_READ, true)) { closeSocket = true; } } //写事件 if (!closeSocket && sk.isWritable()) { //调用processSocket方法进一步处理 if (!processSocket(attachment, SocketEvent.OPEN_WRITE, true)) { closeSocket = true; } } if (closeSocket) { cancelledKey(sk); } } } } else { //invalid key cancelledKey(sk); } } catch ( CancelledKeyException ckx ) { cancelledKey(sk); } catch (Throwable t) { ExceptionUtils.handleThrowable(t); log.error("",t); }} 继续跟踪processSocket方法:
public boolean processSocket(SocketWrapperBasesocketWrapper, SocketEvent event, boolean dispatch) { try { if (socketWrapper == null) { return false; } // 尝试循环利用之前回收的SocketProcessor对象,如果没有可回收利用的则创建新的SocketProcessor对象 SocketProcessorBasesc = processorCache.pop(); if (sc == null) { sc = createSocketProcessor(socketWrapper, event); } else { // 循环利用回收的SocketProcessor对象 sc.reset(socketWrapper, event); } Executor executor = getExecutor(); if (dispatch && executor != null) { //SocketProcessor实现了Runneble接口,可以直接传入execute方法进行处理 executor.execute(sc); } else { sc.run(); } } catch (RejectedExecutionException ree) { getLog().warn(sm.getString("endpoint.executor.fail", socketWrapper) , ree); return false; } catch (Throwable t) { ExceptionUtils.handleThrowable(t); // This means we got an OOM or similar creating a thread, or that // the pool and its queue are full getLog().error(sm.getString("endpoint.process.fail"), t); return false; } return true;}//NioEndpoint中createSocketProcessor创建一个SocketProcessor。protected SocketProcessorBasecreateSocketProcessor( SocketWrapperBase socketWrapper, SocketEvent event) { return new SocketProcessor(socketWrapper, event);}
总结:
Http11NioProtocol是基于Java Nio实现的,创建了Acceptor、Poller和Worker线程实现多路io的复用。三类线程之间的关系如下图所示:
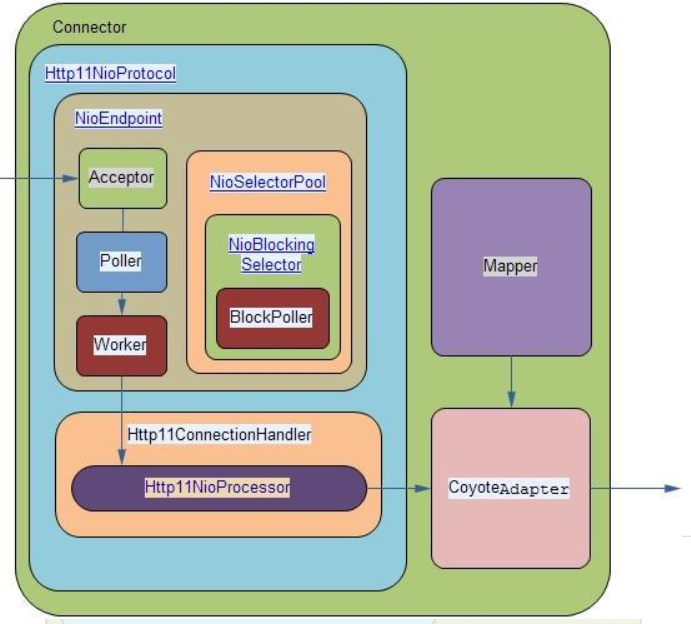
Acceptor和Poller之间是生产者消费者模式的关系,Acceptor不断向EventQueue中添加PollerEvent,Pollor轮询检查EventQueue中就绪的PollerEvent,然后发送给Work线程进行处理。